Note: There’s a much easier way to do this now, using Blender and an addon script I created. Check it out here – or continue reading the (decidedly dated) tutorial below.
Despite the fact that Game Maker is a relatively easy program to learn, taking the plunge into creating 3D games with it can be a pain, especially when many of the common questions about 3D simply aren’t addressed in the manual. One of the most common questions people have regarding 3D is how to import their own models into the game, and that is exactly the problem I’m going to address with this tutorial.
Project files for this tutorial can be downloaded here (276 Kb). The tutorial included in the zip file may be a bit outdated compared to the one posted here.
Though I won’t cover every little detail, I will show you how I import models myself, so as to shed some light on the overall process from a real perspective. To begin, here are the steps that I will go through:
- Constructing the model & exporting the model as an OBJ
- Fixing UV coordinates
- Creating a texture map
- Importing into GM
Of course, just as a painter would be nowhere without his brush, we would be nowhere without a few good pieces of software. Here is a list of all the tools I am using, with links provided to those that are freely available for you to use:
- trueSpace 5 (trueSpace 7 is available for free)
- UVMapper Classic
- Marzipan
- Mosaic Light
Marzipan and Mosaic Light are two great, open-source tools (created by Zoltan Percsich) for manipulating and converting 3D objects for use with Game Maker.
Step 1: Constructing the model & exporting the model as an OBJ file
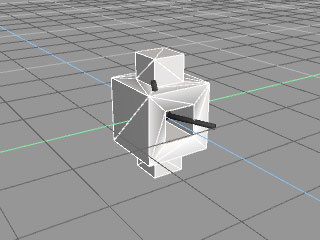
First things first, let’s get a quick little custom model ready. I’ve used trueSpace 5 to create a simple model, like the one pictured below. You can use whatever model you want, just take care that it’s not overly complex. If your modeling software doesn’t export to OBJ file format, you’ll have to find a plug-in for that. I use a plug-in called Luuv.
When you export your model, take note of where it is in your 3D modeler. If the program exports objects relative to the origin of the 3D world, then that will be the default location around which your object rotates when you get it in GM. You can use this knowledge to your advantage though, and pre-plan the axis locations of your objects by exporting them in different places depending on your needs. For now, I recommend placing your object in the world so that the origin (world coordinate 0, 0, 0) is right at the center of it.
Once you’ve got your model exported, find the file and put it somewhere that will be easy to access by your game. I recommend placing it in the same directory as your game while you test – you can always add directories to organize your files later, when you’ve got the rest of the game’s details worked out.
I’ve provided an example Game Maker file that can load models on-the-fly using Mosaic Light. I think it’ll be best if we use the example program to load and test the model for this tutorial; you can look at the actual code later (it’s simple stuff though, trust me).
If you like, try loading your model into this program. Open up the Game Maker file and run it, and then press Space to load your model. The program will also ask you to load a texture file, but since we don’t have one yet, just press Cancel when you’re prompted. Bear in mind that if your object is on an extremely different scale than this program draws, you may wind up seeing a very small or large model in the view. If this is the case, adjust your model scales accordingly within your modeling program and re-output the file, or edit the code of the viewer to scale your object as it draws. When you’re done checking out your model, let’s continue.
One thing I’ve noticed with trueSpace is that for some reason, when I export models as OBJ files and import them directly into Game Maker with Mosaic Light, the normals appear to be rounded, so the object’s sharp edges look dull and the lighting is off, even on flat surfaces. To fix this, I import my OBJ files into Marzipan first. This step might be unnecessary for some people, but I opted to include it because it can be a frustrating problem for beginners. If your set of tools doesn’t suffer this problem, you can skip the next few paragraphs and resume the tutorial at the UV mapping section.
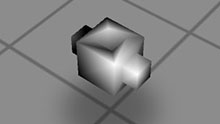
Here’s what my model looks like when I import it into GM without any changes, to better illustrate my point:
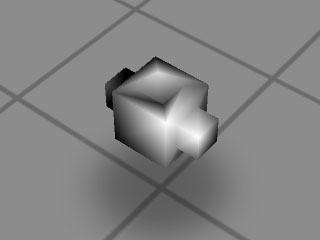
Doesn’t look as good as the model did in trueSpace, huh? No need to worry though, as a quick run through Marzipan will fix the problem. All I have to do is load the object up and click Tools > Fix normals. After that, it’s safe to export the object and continue on. Just click Export > Wavefront OBJ and you’re good to go.
Note that you can also use Marzipan to adjust the orientation, scaling, and position of your model, in case they are not how you intended them to be.
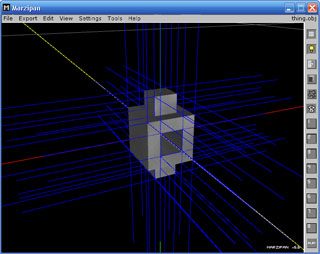
Here’s what the normals on my object look like once they are fixed:
Step 2: Fixing the model’s UV coordinates
At this point, it’d be a good time to adjust the model’s UV coordinates and generate a texture map for it. We can do that with a handy little program called UVMapper. UVMapper isn’t extremely easy to understand at first, but its simplicity dampens the learning curve quite a bit for newbies. Open up UVMapper, press File > Load Model… and get ready for some excitement. You should see something like this:
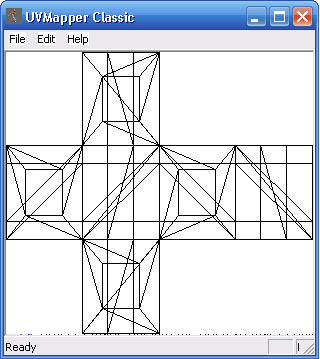
It looks almost right, but in order for us to be able to map all sides of the object, we’ll have to generate a new UV map. Click Edit > New UV Map to see the different choices for creating a new map.
If you have experience with UV mapping, you’ll instantly recognize the different UV map options. If not, let me explain. Each option you see on this list (planar, box, cylindrical, cylindrical cap, and spherical) is a different method of projecting the texture onto the object. Some are better for certain types of model shapes than others; it will be up to you to learn which is best for each situation. For my model, I will use a box UV map.
Now you’ll see a menu giving you further options for your map. Though it’s not completely necessary at this point, we’ll set the map size to 512. I also recommend enabling Split Front/Back and Gaps In Map, as they will help make your texture easier to edit. These are handy features to tinker with, and I recommend trying out different combinations later as you learn the program better. When you’re done, you’ll see that the UV map has updated:
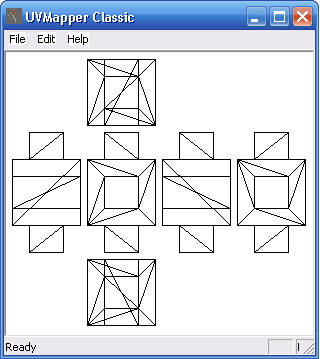
If you like, you can adjust the positions of any surface by drawing a lasso around the pieces you want to move and then dragging them to the desired position. Under normal circumstances, I would want to drag the inside walls of the object out into the open so I could texture them easier, but for the sake of simplicity, I’ll leave this map just as it is.
This is definitely another area of UV mapping that you should experiment with later, though – you can achieve lots of interesting effects by altering the positions of the UV coordinates here, as well as save yourself quite a bit of time, for example, by overlapping triangles that share the same texture.
Step 3: Creating a simple texture map
Now that our UV mapping is done, let’s save the object with its new UV coordinates. Click File > Save Model… and you’ll be presented with a window full of options. I usually un-check some of the options I don’t need, leaving only Export Normals, Export UV Coordinates, and Export UV Mapper Regions checked. Again, your needs may be different, so familiarize yourself with the functions of this window and adjust them as your needs require.
Finally, it’s time to save the map as an image so we’ll know where we’re going to draw textures. Press File > Save Texture Map… and you’ll see yet another options window. Make sure that the size of the texture here is set to a size that you can use in your game (64 x 64, 128 x 128, 256 x 256, etc.), and make sure both sides are set to the same size.
For my models, I usually have to check the box to Flip Texture Map Vertically, but depending on how your modeler exported the file, you may not have to do this. You can also perform this task quite easily in Marzipan, after you’re done with UV mapping.
Save your texture map in the same directory as your model, so it will be easy to find, and let’s continue.
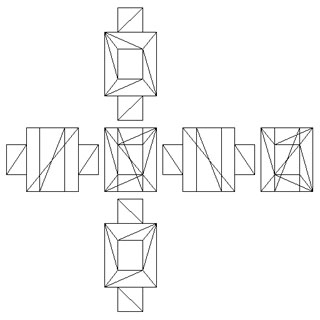
Open up the model viewer example again, load your newly-UV mapped model, and when prompted, point the program to the new texture map as well. If you’ve got everything saved correctly, the lines on the texture should map the lines of the mesh of your object, like the picture below:
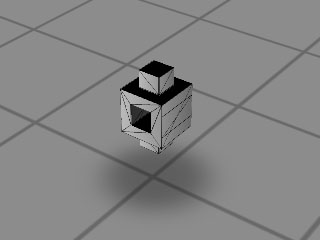
If they did not, you may have to open your model back up in UVMapper or Marzipan to re-save the UV coordinates but flipped around (usually on the Y-axis). Your model may also need to be rotated to be at the same orientation as it was in your modeler, which is a simple transform you can add to the draw code in the example model viewer. Once your texture and model are properly aligned, continue on.
Now that we’ve got our model running with the corrected UV mapped texture applied, it’s time to actually make the texture into something other than a bunch of lines. Open the texture up in your favorite graphics editor and try applying some color to it. I added some simple blocks of color, to give me an idea of which side is which, and to liven it up a little bit:
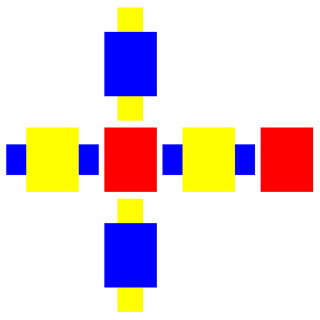
And here’s how the new colored map looks on the model:
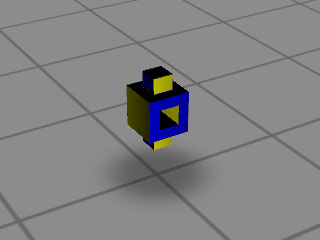
Pretty simple, eh? Not as hard as you might have first thought? There are certainly a lot of steps involved, but once you get used to transferring models from your modeler to GM, it takes no time at all.
Step 4: Importing into Game Maker
Take a look at the code in the example for importing the model (using the Mosaic Light script). There’s not much to it. This code would go somewhere like a Create Event, and only needs to be called once per model, unless you want to update the model later:
model = createFromObj(file); //where file is the file name
tex = background_get_texture(background); //where background is a background resource in your game
Now just a single line of code in the object’s Draw Event:
d3d_model_draw(model, 0, 0 ,0, tex); //where tex is the texture you loadedPlug in the right information for model and texture data, and you’re good to go!
And that about wraps things up! I hope that this example/tutorial was useful for some of you, and that it did not raise more questions than it answered. Good luck with your 3D projects!
15 Comments
Great stuff! I am a heavy 3d illustrator and I am working on some portfolio work to showcase my skills:)
I have many video game ideas for game maker and
Being able to import my fancy colorful objs would be
Like the rocket fuel for my jet engine…
I get how to create an obj and adjust the uvs to get
What you were able to make but how extensive can the objs get?
What if I had a bunch of bumpy terrain?
As long as it wasnt to complicated, can that be done?
Plus, is it hard to do things with the objs once they are in?
Could I create a ground plane and they add things on top of that and
Maybe shoot them to smithereens?
Thank you,
Thanks James, glad I could help (and sorry for the extremely late reply!). To answer your questions:
The object can be quite detailed, as long as your computer can handle it, but you have to remember that other people playing your game might not have as much beef to their system as you might… so always try to use as few polygons as possible, draw as many as you can in each operation, and use good textures to hide the simplicity!
Indeed, you could do this… but I’d recommend against it, for the same reason mentioned above. Use as few polygons as possible whenever you can!
Manipulating OBJ files is the same as any other model file once they are in your game… moving them around, rotating, and scaling them is pretty easy. Stacking lots of transforms can slow things down though, so build things how they ought to be (or as close as possible) first.
Animations that are built-in to OBJ files are not supported, unfortunately, so you’ll have to animated things in GameMaker… which could mean you’ll have to program your own animation system or build a segmented model in parts.
With the proper engineering, just about anything is possible. This is definitely something you could accomplish easily, I think. Good luck! :)
cool, but i have dial up so it will not load, i’ll try though!
Good luck!
Great job. I really appreciate your work. It is very helpful for 3d Modeling. Keep it up.
helped me, so thank you so much.
Do you have a training video.?
Thank you very much !!!!!!!!
You help me enormous!
Thank you so much!!! Thanks for helping me get my head around UVMapper!! If I could give you a rating it would be 500/10!!
I forgot to say you’re a legend!!
Hey John – you’re welcome, and thanks! Don’t forget, too, that Blender is an even better tool to use for this sort of thing.
You can read more about how to make that work here: http://martincrownover.com/update-to-blender-addon-for-exporting-3d-models-to-gamemaker/ and on the original page I wrote up for that, here: http://martincrownover.com/blender-addon-gm3d/
That addon will help you get your models into GameMaker much easier than this tutorial did. Whatever worsk for you, of course. Good luck!
Hey John – you’re welcome! Don’t forget, too, that Blender is an even better tool to use for this sort of thing.
You can read more about how to make that work here: http://martincrownover.com/update-to-blender-addon-for-exporting-3d-models-to-gamemaker/ and on the original page I wrote up for that, here: http://martincrownover.com/blender-addon-gm3d/
That addon will help you get your models into GameMaker much easier than this tutorial did. Whatever worsk for you, of course. Good luck!
Thanks Martin.
You’re welcome! :)
link dead… can you re-upload mosaic light?
1 Trackback or Pingback